Amplifying ClickHouse® Capacity with Multi-Volume Storage (Part 2)

29 Nov, 2019
Read part 1 here
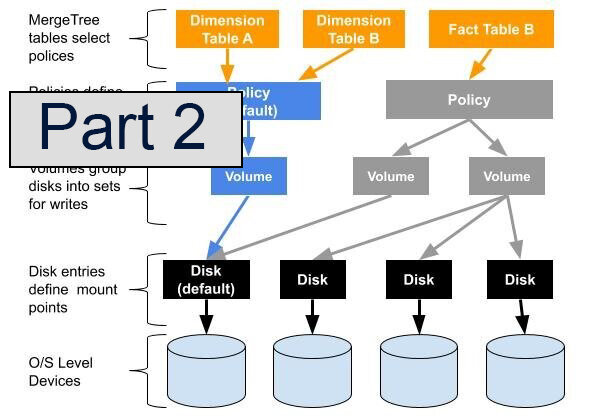
This article is a continuation of the series describing multi-volume storage, which greatly increases ClickHouse server capacity using tiered storage. In the previous article we introduced why tiered storage is important, described multi-volume organization in ClickHouse, and worked through a concrete example of setting up disk definitions.
The current article picks up the thread with storage policies, which enable us to arrange disks into volumes and set up relationships between them. We’ll build up from simple to complex configurations. This will help us reach goal of configuring tiered storage.
Storage policies
In the previous post we showed how to configure multiple disks. However, there’s more work to do. At this point table MergeTree data is still stored on the default disk (i.e. /var/lib/clickhouse/). We can prove that easily using the convenient data_paths column that has been added to system.tables. Here’s an example.
CREATE TABLE sample1 (id UInt64) Engine=MergeTree ORDER BY id;

INSERT INTO sample1 SELECT * FROM numbers(1000000);

SELECT name, data_paths FROM system.tables WHERE name = 'sample1'\G

Row 1:
───────€
name:       sample1
data_paths: ['/var/lib/clickhouse/data/default/sample1/']

SELECT name, disk_name, path FROM system.parts
   WHERE (table = 'sample1') AND active\G

Row 1:
───────€
name:      all_1_1_0
disk_name: default
path:      /var/lib/clickhouse/data/default/sample1/all_1_1_0/
The rules for storing data on different disks are set by storage policies. In newly installed or upgraded ClickHouse servers there is a single storage policy, called the ‘default’ which says that all the data should be placed on the default disk. This policy ensures backwards compatibility for existing tables. We can see the definition by selecting from the system.storage_policies table, another new table added to help manage tiered storage.
SELECT policy_name, volume_name, disks
FROM system.storage_policies

┌─policy_name────┬─volume_name─────────┬─disks─────────────────────┐
│ default        │ default             │ ['default']               │
└───────────────┴─────────────────────┴────────────────────────────┘
Single disk policy
Let’s start with a very simple example. We will introduce storage policy named “ebs_gp2_1_only” which will store all the data on on the “ebs_gp2_1_volume” that includes “ebs_gp2_1” disk.
As in the previous article, we put all storage-related configuration in file /etc/clickhouse-server/config.d/storage.xml. The following example also shows the disk configuration we already created previously.
<yandex>
  <storage_configuration>
    <disks>
      <!--
          default disk is special, it always
          exists even if not explicitly
          configured here, but you can't change
          it's path here (you should use <path>
          on top level config instead)
      -->
      <default>
         <!--
             You can reserve some amount of free space
             on any disk (including default) by adding
             keep_free_space_bytes tag
         -->
         <keep_free_space_bytes>1024</keep_free_space_bytes>
      </default>
      <ebs_gp2_1>
         <!--
         disk path must end with a slash,
         folder should be writable for clickhouse user
         -->
         <path>/mnt/ebs_gp2_1/</path>
      </ebs_gp2_1>
      <ebs_gp2_2>
          <path>/mnt/ebs_gp2_2/</path>
      </ebs_gp2_2>
      <ebs_sc1_1>
          <path>/mnt/ebs_sc1_1/</path>
      </ebs_sc1_1>
    </disks>
    <policies>
      <ebs_gp2_1_only> <!-- name for new storage policy -->
        <volumes>
          <ebs_gp2_1_volume> <!-- name of volume -->
            <!--
                we have only one disk in that volume
                and we reference here the name of disk
                as configured above in <disks> section
            -->
            <disk>ebs_gp2_1</disk>
          </ebs_gp2_1_volume>
        </volumes>
      </ebs_gp2_1_only>
    </policies>
  </storage_configuration>
</yandex>
Restart ClickHouse to apply configuration changes & check that our new policy is visible:
SELECT policy_name, volume_name, disks
FROM system.storage_policies

┌─policy_name────┬─volume_name─────────┬─disks─────────────────────┐
│ default        │ default             │ ['default']               │
│ ebs_gp2_1_only │ ebs_gp2_1_volume    │ ['ebs_gp2_1']             │
└───────────────┴─────────────────────┴────────────────────────────┘
Cool, how can we use it now? Just add a SETTINGS storage_policy=’ebs_gp2_1_only’ on a new table.
CREATE TABLE sample2 (id UInt64) Engine=MergeTree
ORDER BY id SETTINGS storage_policy = 'ebs_gp2_1_only';

INSERT INTO sample2 SELECT * FROM numbers(1000000);
Now we can see that this table has storage policy 'ebs_gp2_1_only' and all parts are stored on ‘/mnt/ebs_gp2_1’
SELECT name, data_paths, metadata_path, storage_policy
FROM system.tables
WHERE name LIKE 'sample%'

Row 1:
───────€
name:           sample1
data_paths:     ['/var/lib/clickhouse/data/default/sample1/']
metadata_path:     /var/lib/clickhouse/metadata/default/sample1.sql
storage_policy:     default

Row 2:
───────€
name:           sample2
data_paths:     ['/mnt/ebs_gp2_1/data/default/sample2/']
metadata_path:     /var/lib/clickhouse/metadata/default/sample2.sql
Storage_policy:    ebs_gp2_1_only
You can see that the two tables have different data path and different storage policies. Note that the table metadata remains on the default disk.
We can also check where each part is stored:
SELECT table, disk_name, path
FROM system.parts
WHERE table LIKE 'sample%'

Row 1:
───────€
table:     sample1
disk_name: default
path:      /var/lib/clickhouse/data/default/sample1/all_1_1_0/

Row 2:
───────€
table:     sample2
disk_name: ebs_gp2_1
path:      /mnt/ebs_gp2_1/data/default/sample2/all_1_1_0/
OK, now we know how to store tables on another disk.
You can of course copy the data from one table to another with the usual INSERT … SELECT regardless of where the source and target tables are located.
JBOD: Single-tier volume with several disks.
In the previous example we were storing data on one disk. How can we store the data on several disks?
We can use a storage policy to group two or more disks in a single volume. When we do so the data will be distributed between the disk in a round-robin manner: each insert (or merge) creates a part on the next disk in the volume. Half of the parts are stored on one disk, and the remainder on the other. This concept is usually called JBOD, which is short for “Just a Bunch of Disks.”
JBOD volume organization provides several useful benefits:
An easy way to extend the storage by attaching additional disks. This is far simpler than migrating to RAID.
Read/write speed gains in certain conditions, such as when multiple threads use different disks in parallel.
Faster table loading, since the number of parts on each disk is smaller.
Note that when you use JBOD, the failure of one disk will lead to data loss. Adding more disks increases the chance you will lose at least some data. Always use replication when fault tolerance is important.
Now let’s try to join two SSD disks into one JBOD volume. We add the following storage policy to our storage.xml file:
<ebs_gp2_jbod> > <!-- name for new storage policy -->
  <volumes>
    <ebs_gp2_jbod_volume> <!-- name of volume -->
       <!--
          the order of listing disks inside
          volume defines round-robin sequence
          -->
          <disk>ebs_gp2_1</disk>
          <disk>ebs_gp2_2</disk>
    </ebs_gp2_jbod_volume>
  </volumes>
</ebs_gp2_jbod>
We restart ClickHouse and check the storage policies in system.storage_policies.
SELECT policy_name, volume_name, disks
FROM system.storage_policies

┌─policy_name────┬─volume_name─────────┬─disks─────────────────────┐
│ default        │ default             │ ['default']               │
│ ebs_gp2_1_only │ ebs_gp2_1_volume    │ ['ebs_gp2_1']             │
│ ebs_gp2_jbod   │ ebs_gp2_jbod_volume │ ['ebs_gp2_1','ebs_gp2_2'] │
└───────────────┴─────────────────────┴────────────────────────────┘
Let’s create a table with the new policy.
CREATE TABLE sample3 (id UInt64) Engine=MergeTree ORDER BY id SETTINGS storage_policy = 'ebs_gp2_jbod';

SELECT
    name,
    data_paths,
    metadata_path,
    storage_policy
FROM system.tables
WHERE name = 'sample3'

Row 1:
───────€
name:           sample3
data_paths:     ['/mnt/ebs_gp2_1/data/default/sample3/','/mnt/ebs_gp2_2/data/default/sample3/']
metadata_path:  /var/lib/clickhouse/metadata/default/sample3.sql
storage_policy: ebs_gp2_jbod
We can now add data and check where parts land.
insert into sample3 select * from numbers(1000000);
insert into sample3 select * from numbers(1000000);
insert into sample3 select * from numbers(1000000);
insert into sample3 select * from numbers(1000000);

select name, disk_name, path from system.parts where table = 'sample3';

┌─name──────┬─disk_name─┬─path───────────────────────────────────────────┐
│ all_1_1_0 │ ebs_gp2_1 │ /mnt/ebs_gp2_1/data/default/sample3/all_1_1_0/ │
│ all_2_2_0 │ ebs_gp2_2 │ /mnt/ebs_gp2_2/data/default/sample3/all_2_2_0/ │
│ all_3_3_0 │ ebs_gp2_1 │ /mnt/ebs_gp2_1/data/default/sample3/all_3_3_0/ │
│ all_4_4_0 │ ebs_gp2_2 │ /mnt/ebs_gp2_2/data/default/sample3/all_4_4_0/ │
└──────────┴───────────┴─────────────────────────────────────────────────┘
Background merges can collect data from parts on different disks and put new bigger part on one of the disks of the volume (also according to round-robin). We can see the behavior in this example by running OPTIMIZE TABLE to force a merge.
OPTIMIZE TABLE sample3
Ok.
0 rows in set. Elapsed: 0.240 sec.

SELECT
    name,
    disk_name,
    path
FROM system.parts
WHERE (table = 'sample3') AND active

┌─name──────┬─disk_name─┬─path───────────────────────────────────────────┐
│ all_1_4_1 │ ebs_gp2_1 │ /mnt/ebs_gp2_1/data/default/sample3/all_1_4_1/ │
└──────────┴───────────┴─────────────────────────────────────────────────┘
Background merges will tend to create bigger and bigger parts with time, moving each resulting part to one of the disks. As a result our storage policy does not give any guarantee that data will be evenly distributed across disks. It also does not guarantee that I/O throughput will be better on JBOD than on the slowest disk. To get such guarantees you should use RAID instead.
The most obvious reason to use a JBOD storage policy is to increase capacity on a ClickHouse server by adding additional storage without moving existing data.
Multi-tiered storage: volumes with different priorities
We are now ready to look at the most interesting use case for the multi-volume feature, namely configuration of tiered storage.
Let’s return briefly to the motivating problem that started this series of blog posts. We have newly inserted data that is considered hot, and accessed regularly. This needs to be on fast but costly storage. Next, we have older data that is cold. It is rarely accessed outside of batch queries and performance is not a big consideration. Cold data can go on slower, cheaper storage.
To implement this in a storage policy we’ll need to define the following:
Where new data should land on initial insertion.
When it should be moved to slower storage.
ClickHouse 19.15 uses heuristics based on part size to determine when to move parts between volumes. Part size and part age usually is tightly connected in ClickHouse and correlates roughly with the age of the part. MergeTree engine does background merges all the time, combining freshly inserted data and small parts into bigger and bigger parts with time. This means that big parts appear after several merges, so usually the bigger the part, the older it is.
Note: we are also working on another age-based approach to move data across tiers. It extends the TTL (“time to live”) mechanism currently used to drop old table rows in MergeTree, for example after 30 days. When the feature is complete you will be able to use TTL expressions to move data between volumes. Watch for a blog article on this topic in the near future.
Let’s now configure tiered storage using the following storage policy. As usual we need to restart for this to take effect.
<ebs_hot_and_cold>
  <volumes>
    <hot_volume>
       <disk>ebs_gp2_2</disk>
        <!--
           that volume allowed to store only parts which
           size is less or equal 200Mb
        -->
        <max_data_part_size_bytes>200000000</max_data_part_size_bytes>
    </hot_volume>
    <cold_volume>
        <disk>ebs_sc1_1</disk>
        <!--
          that volume will be used only when the first
          has no space of if part size doesn't satisfy
          the max_data_part_size_bytes requirement of the
          first volume, i.e. if part size is greater
          than 200Mb
        -->
    </cold_volume>
  </volumes>
</ebs_hot_and_cold>
The order of volumes in the policy is very important. When storing the new part on the disk, ClickHouse first tries to put it in the first volume, then on the second and so on.
SELECT *
FROM system.storage_policies
WHERE policy_name = 'ebs_hot_and_cold'

Row 1:
───────€
policy_name:        ebs_hot_and_cold
volume_name:        hot_volume
volume_priority:    1
disks:              ['ebs_gp2_2']
max_data_part_size:     200000000
move_factor:        0.1

Row 2:
───────€
policy_name:        ebs_hot_and_cold
volume_name:        cold_volume
volume_priority:    2
disks:              ['ebs_sc1_1']
Max_data_part_size:    0
move_factor:        0.1
Let’s create a table that uses our new tiered storage configuration.
CREATE TABLE sample4 (id UInt64) Engine=MergeTree ORDER BY id SETTINGS storage_policy = 'ebs_hot_and_cold';

INSERT INTO sample4 SELECT rand() FROM numbers(10000000);
-- repeat 10 times

SELECT
    disk_name,
    formatReadableSize(bytes_on_disk) AS size
FROM system.parts
WHERE (table = 'sample4') AND active

┌─disk_name─┬─size───────┐
│ ebs_gp2_2 │ 121.30 MiB │
│ ebs_gp2_2 │ 123.53 MiB │
│ ebs_gp2_2 │ 131.84 MiB │
│ ebs_gp2_2 │ 5.04 MiB   │
│ ebs_gp2_2 │ 2.74 MiB   │
└──────────┴─────────────┘
For now all the data is ‘hot’ and stored on the fast disk.
INSERT INTO sample4 SELECT rand() FROM numbers(10000000);
-- repeat 8 more times, and wait a bit

SELECT
    disk_name,
    formatReadableSize(bytes_on_disk) AS size
FROM system.parts
WHERE (table = 'sample4') AND active

┌─disk_name─┬─size───────┐
│ ebs_sc1_1 │ 570.56 MiB │
│ ebs_gp2_2 │ 26.90 MiB  │
│ ebs_gp2_2 │ 29.08 MiB  │
│ ebs_gp2_2 │ 26.90 MiB  │
│ ebs_gp2_2 │ 5.04 MiB   │
│ ebs_gp2_2 │ 5.04 MiB   │
│ ebs_gp2_2 │ 5.04 MiB   │
│ ebs_gp2_2 │ 5.04 MiB   │
│ ebs_gp2_2 │ 2.74 MiB   │
└──────────┴─────────────┘
Now you can see that the merge has created a huge part which was placed in the cold storage.
The decision where to place the new part is done based on the estimation of new part size, which can be different from the actual part size. For inserts the part size is estimated using the uncompressed part size. For merges ClickHouse uses the sum of compressed sizes of merged parts + 10%. The estimate is approximate and may not be fully accurate in all cases. You may see some parts that are a bit smaller than the limit on slower disks, or parts that are a bit larger on the faster disk.
Moving Parts Manually
Beside the automatic movement that happens during background merge, you can move parts and partitions manually with new ALTER command syntax.
ALTER TABLE sample4 MOVE PART 'all_570_570_0' TO VOLUME 'cold_volume'
ALTER TABLE sample4 MOVE PART 'all_570_570_0' TO DISK 'ebs_gp2_1'
ALTER TABLE sample4 MOVE PARTITION tuple() TO VOLUME 'cold_volume'
Also, when a volume has less than 10% of free space, ClickHouse will try to free space by moving parts in background to the next volume. You can adjust that by changing move_factor, which by default is 0.1 = 10%. You can also completely disable automatic background moves by using move_factor of 0.
Background moves are executed in the same manner as background merges. Currently you can’t see that a move is running, but you can see the log of movements in system.part_log.
Let’s see how it works. We will enable the part_log and set an extremely high move_factor to see what happens. (Don’t do this in production!)
<ebs_hot_and_cold_movefactor99>
  <volumes>
    <hot_volume>
        <disk>ebs_gp2_2</disk>
        <max_data_part_size_bytes>200000000</max_data_part_size_bytes>
    </hot_volume>
    <cold_volume>
        <disk>ebs_sc1_1</disk>
    </cold_volume>
  </volumes>
  <move_factor>0.9999</move_factor>
</ebs_hot_and_cold_movefactor99>
In case you are wondering how to enable the part_log table, add the following configuration to /etc/clickhouse-server/config.d/part_log.xml:
<yandex>
  <part_log>
    <database>system</database>
    <table>part_log</table>
    <flush_interval_milliseconds>7500</flush_interval_milliseconds>
  </part_log>
</yandex>
Now create a table and load some data.
CREATE TABLE sample5 (id UInt64) Engine=MergeTree ORDER BY id SETTINGS storage_policy = 'ebs_hot_and_cold_movefactor99';

INSERT INTO sample5 SELECT rand() FROM numbers(100);

SELECT event_type, path_on_disk
FROM system.part_log

┌─event_type─┬─path_on_disk───────────────────────────────────┐
│ NewPart    │ /mnt/ebs_gp2_2/data/default/sample5/all_1_1_0/ │
│ MovePart   │ /mnt/ebs_sc1_1/data/default/sample5/all_1_1_0/ │
└───────────┴─────────────────────────────────────────────────┘
As we can see here the insert put the new part on the first disk, but the background process sees that according to the move factor the part should be moved and moves it to the second disk.
Combining JBOD and tiered storage
So far we have seen how to create a volume with a group of disks (“JBOD”) and how to create tiered storage across single disks. In our final example we can combine these notions to create multiple tiered volumes, each containing several disks.
<three_tier>
  <volumes>
    <hot_volume>
      <disk>superfast_ssd1</disk>
       <disk>superfast_ssd2</disk>
      <max_data_part_size_bytes>200000000</max_data_part_size_bytes>
    </hot_volume>
    <jbod_volume>
      <disk>normal_hdd1</disk>
      <disk>normal_hdd2</disk>
      <disk>normal_hdd3</disk>
      <max_data_part_size_bytes>80000000000</max_data_part_size_bytes>
    </jbod_volume>
    <archive_volume>
      <disk>slow_and_huge</disk>
    </archive_volume>
  </volumes>
</three_tier>
Conclusion and more to come
This article showed how to build storage policies and apply them to distribute MergeTree table data in different ways. The most useful configuration is to enable tiered storage. As we saw, however, you can use storage policies to solve other problems as well.
We hope you enjoyed this article as much as the first one. We plan to publish a future article to discuss multi-volume operational management as well as a few corner cases and problems you may encounter in multi-volume configurations. Meanwhile, we encourage you to try out tiered storage. You can provide feedback by logging Github issues on ClickHouse. We look forward to hearing from you!
ClickHouse® is a registered trademark of ClickHouse, Inc.; Altinity is not affiliated with or associated with ClickHouse, Inc.
Hi,
I have question about what if the last volume is full in the multi-tires setup.
Will ClickHouse remove largest parts from the last volume according to move_factor, or a back pressure will occur that will cause the upper streams stops accepting further insertion?
Thanks.